Tutorial: Creating Struts application in NetBeans
Things We Need
Before we starts with our first Hello World Struts Example, we will need following Software & Resource.
| Software or Resource | Version Required |
|---|---|
| NetBeans IDE | 7.1, 7.2, 7.3, 7.4, Java EE |
| Java Development Kit (JDK) | 6 or 7 |
| GlassFish server or Tomcat servlet container | Open Source Edition 3.x or 4.0 version 6.x or 7.x |
Notes:
- The Java installation enables you to optionally install the GlassFish server and the Apache Tomcat servlet container. You must install one of these (or register a different server in the IDE) to work through this tutorial.
- If you need to compare your project with a working solution, you can download the sample application.
Getting Started
Let us start with our first Struts based application.
Open NetBeans and goto File -> New Project and select JAVA Web --> Web Application in the New Project wizard screen.
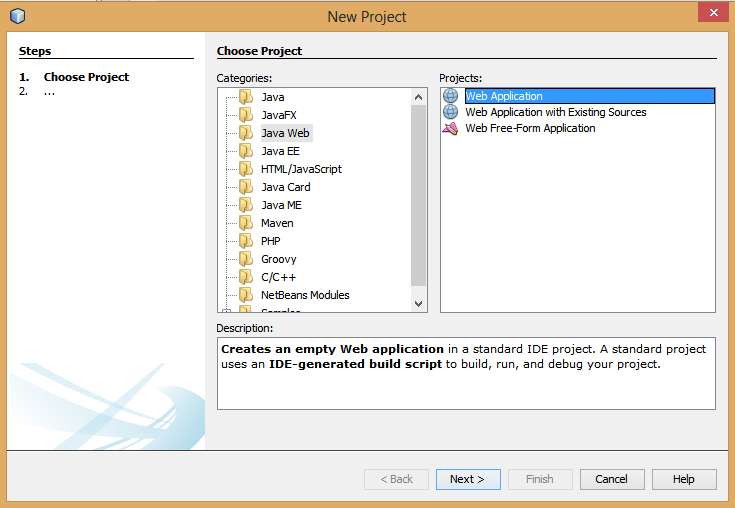
After selecting Web Application Project, press Next.

Write the name of the project. For example StrutsHelloWorld.
Once this is done, select the target runtime environment (e.g. Apache
Tomcat 7.0.34.0). This is to run the project inside NetBeans environment.
After this press Next.

Select the Struts 1.3.10 frameworks and Select Add Struts TLDs. After this press Finish.
Once the project is created, you can see its structure in Project Explorer.

Mapping Struts in WEB.xml
The Action Class
We will need an Action class that will
authenticate our user and holds the value for username and password. For
this we will create a package com.myapp.struts.action in the source folder. This package will contain the action file.
.png)
Create a class called LoginAction in com.myapp.struts,action package with following content.
package com.myapp.struts.action;
public class LoginAction {
private String username;
private String password;
public String execute() {
if (this.username.equals("admin")
&& this.password.equals("admin123")) {
return "success";
} else {
return "error";
}
}
public String getUsername() {
return username;
}
public void setUsername(String username) {
this.username = username;
}
public String getPassword() {
return password;
}
public void setPassword(String password) {
this.password = password;
}
}
Note that, above action class contains two fields, username and
password which will hold the values from form and also contains an
execute() method that will authenticate the user. In this simple example, we are checking if username is admin and password is admin123.
Also note that unlike Action class in Struts1, Struts2 action class is a simple POJO class with required attributes and method.
The
execute()
method returns a String value which will determine the result page.
Also, in Struts2 the name of the method is not fixed. In this example we
have define method execute(). You may want to define a method authenticate() instead.The ResourceBundle
ResourceBundle is very useful Java entity
that helps in putting the static content away from the source file. Most
of the application define a resource bundle file such as
ApplicationResources.properties file which contains static messages such
as Username or Password and include this with the application.
ResourceBundle comes handy when we want to add Internationalization (I18N) support to an application.
We
will define an ApplicationResources.properties file for our
application. This property file should be present in WEB-INF/classes
folders when the source is compiled. Thus we will create a source folder
called resources and put the ApplicationResources.properties file in it.
a file ApplicationResources.properties under com.myapp.struts folder.

Copy following content in ApplicationResources.properties.
label.username= Usernamelabel.password= Passwordlabel.login= LoginThe JSP
We will create two JSP files to render the output to user. Login.jsp will be the starting point of our application which will contain a simple login form with username and password. On successful authentication, user will be redirected to Welcome.jsp which will display a simple welcome message.Create two JSP files Login.jsp and Welcome.jsp in WebContent folder of your project. Copy following content into it.
Login.jsp
<%@ page contentType="text/html; charset=UTF-8"%><%@ taglib uri="http://struts.apache.org/tags-html" prefix="html" %><html><head><title>Struts 2- Login Application</title></head><body><h2>Struts2- Login Application</h2><html:actionerror/><html:formaction="login.action" method="post"> <html:textfieldname="username" key="label.username" size="20" /> <html:passwordname="password" key="label.password" size="20" /> <html:submitmethod="execute" key="label.login" align="center" /></html:form></body></html>WelcomeStruts.jsp
<%@page contentType="text/html"%> |
The struts.xml file
Struts reads the configuration and class definition from an xml file called struts.xml. This file is loaded from the classpath of the project. We will define struts.xml file in the com.myapp.struts folder. Create file struts.xml in resources folder.Copy following content into struts.xml.
<?xml version="1.0" encoding="UTF-8" ?><!DOCTYPE struts PUBLIC "-//Apache Software Foundation//DTD Struts Configuration 2.0//EN" "http://struts.apache.org/dtds/struts-2.0.dtd"><struts> <constant name="struts.enable.DynamicMethodInvocation" value="false" /> <constant name="struts.devMode" value="false" /> <constant name="struts.custom.i18n.resources" value="ApplicationResources" /> <package name="default" extends="struts-default" namespace="/"> <action name="login" class="net.viralpatel.struts2.LoginAction"> <result name="success">Welcome.jsp</result> <result name="error">Login.jsp</result> </action> </package></struts> |
execute() method. If execute() method returns success, user will be redirected to WelcomeStruts.jsp else to Login.jsp.Also note that a constant is specified with name struts.custom.i18n.resources. This constant specify the resource bundle file that we created in above steps. We just have to specify name of resource bundle file without extension (ApplicationResources without .properties).
Our LoginAction contains the method execute() which is the default method getting called by Sturts2. If the name of method is different, e.g. authenticate(); then we should specify the method name in
<action> tag.<action name="login" method="authenticate" class="com.myapp.struts.LoginAction">Final Touch
To add this functionality first we will add the error message in our ResourceBundle file.Open ApplicationResources.properties and add an entry for error.login in it. The final ApplicationResources.properties will look like:
label.username= Usernamelabel.password= Passwordlabel.login= Loginerror.login= Invalid Username/Password. Please try again. |
For this we must implement
com.opensymphony.xwork2.TextProvider interface which provides method getText().
This method returns String value from resource bundle file. We just
have to pass the key value as argument to getText() method. The
TextProvider interface defines several method that we must implement in
order to get hold on getText() method. But we don’t want to spoil our
code by adding all those methods which we do not intend to use. There is
a good way of dealing with this problem.Struts2 comes with a very useful class
com.opensymphony.xwork2.ActionSupport.
We just have to extend our LoginAction class with this class and
directly use methods such as getText(), addActionErrors() etc. Thus we
will extend the LoginAction class with ActionSupport class and add the
logic for error reporting into it. The final code in LoginAction must
look like:package com.myapp.struts.action;import com.opensymphony.xwork2.ActionSupport;public class LoginAction extends ActionSupport { private String username; private String password; public String execute() { if (this.username.equals("admin") && this.password.equals("admin123")) { return "success"; } else { addActionError(getText("error.login")); return "error"; } } public String getUsername() { return username; } public void setUsername(String username) { this.username = username; } public String getPassword() { return password; } public void setPassword(String password) { this.password = password; }}That’s All Folks
Execute the application in NetBeans and run it in your favorite browser.Login page

Welcome page

Login page with error


Comments
Post a Comment